Add a Date Field Word Consulting Templates For Free
How it works
-
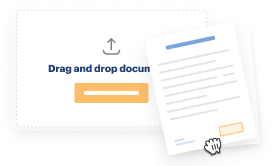
Import your Consulting Forms from your device or the cloud, or use other available upload options.
-
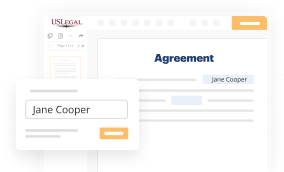
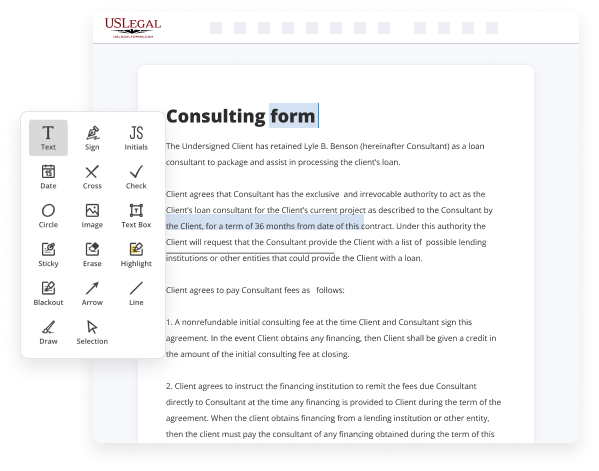
Make all necessary changes in your paperwork — add text, checks or cross marks, images, drawings, and more.
-

Sign your Consulting Forms with a legally-binding electronic signature within clicks.
-
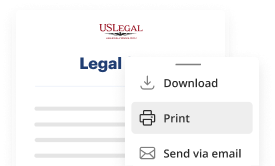
Download your completed work, export it to the cloud, print it out, or share it with others using any available methods.
How to Add a Date Field Word Consulting Templates For Free
Legal documentation requires maximum accuracy and prompt execution. While printing and filling forms out frequently takes plenty of time, online document editors prove their practicality and efficiency. Our service is at your disposal if you’re looking for a reliable and easy-to-use tool to Add a Date Field Word Consulting Templates For Free rapidly and securely. Once you try it, you will be amazed at how effortless working with formal paperwork can be.
Follow the instructions below to Add a Date Field Word Consulting Templates For Free:
- Upload your template via one of the available options - from your device, cloud, or PDF library. You can also get it from an email or direct URL or using a request from another person.
- Utilize the top toolbar to fill out your document: start typing in text fields and click on the box fields to choose appropriate options.
- Make other essential modifications: insert images, lines, or signs, highlight or delete some details, etc.
- Use our side tools to make page arrangements - insert new sheets, alter their order, delete unnecessary ones, add page numbers if missing, etc.
- Drop additional fields to your document requesting various types of data and place watermarks to protect the contents from unauthorized copying.
- Check if things are true and sign your paperwork - create a legally-binding eSignature in your preferred way and place the current date next to it.
- Click Done once you are ready and decide where to save your form - download it to your device or export it to the cloud in any file format you need.
- Share a copy with other people or send it to them for signature via email, a signing link, SMS, or fax. Request online notarization and get your form rapidly witnessed.
Imagine doing all the above manually in writing when even a single error forces you to reprint and refill all the data from the beginning! With online solutions like ours, things become considerably easier. Try it now!

Benefits of Editing Consulting Forms Online
Top Questions and Answers
Click the "Insert" tab in Word. Find the "Quick Parts" option and select "Field". In the "Field Names" selector, choose "MergeField". In the "Field Properties" pane, type or paste the name of the desired merge field.
Video Guide to Add a Date Field Word Consulting Templates For Free
One of the most fun discoveries new Microsoft Word users make is the self-updating date you may already know exactly what I'm talking about you click a couple of times and suddenly you've got today's date embedded in your document and it will update itself every time you open the document but what if what you want isn't necessarily today's
Date what if you need the document to reflect the date it was saved or printed or created the good news is you can get any of those with a couple more Mouse clicks and a little knowhow for those of you who haven't stumbled across this yet here's how you get today's date into your document on the insert
Tips to Add a Date Field Word Consulting Templates For Free
- Open your Word Consulting Template where you want to add the date field.
- Go to the 'Insert' tab in the top menu.
- Click on 'Quick Parts' and then select 'Field'.
- In the 'Field names' list, choose 'Date' or 'Time' depending on your need.
- Select the desired date format from the options available.
- Click 'OK' to insert the date field into your document.
- If needed, you can right-click the field to update it or adjust its format.
- Save your template to keep the date field for future use.
This feature may be needed when you have documents that require automatic updating of dates, like contracts, reports, or meeting notes.
Related Searches
Open or create a Word document from the matter. From the LEAP ribbon, click Editing > Insert Fields. You can add a switch to the Merge Field to format the date. Modify your documents and Insert Date Field from the Consulting Agreement on any device without breaking a sweat. A simple request, add a current Date value in one location and in another, add a Date value for 30 days from today. Open Microsoft Word. One of the features of Act! Is the ability to create Word templates that can then be auto populated with fields from the act database. Describes how to format values date, numeric, and currency merge fields in your invoice template using mail merge field switches. Follow these steps to create a modern template.
Industry-leading security and compliance
-
In businnes since 1997Over 25 years providing professional legal documents.
-
Accredited businessGuarantees that a business meets BBB accreditation standards in the US and Canada.
-
Secured by BraintreeValidated Level 1 PCI DSS compliant payment gateway that accepts most major credit and debit card brands from across the globe.
-
VeriSign secured#1 Internet-trusted security seal. Ensures that a website is free of malware attacks.